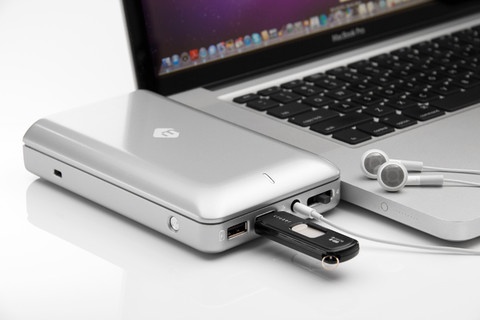
In the late 90s I was the proud owner of an Apple PowerBook Duo, a subcompact notebook that could be complemented by the Apple Duo Dock, which turned the PowerBook Duo into a full-size, AC-powered, fully functional desktop computer with all the standard ports.
It’s 2012 and I’m experiencing deja vu with the mDock from mLogic (www.mlogic.com). It’s a combination docking station and backup solution for 13- and 15-inch unibody MacBook Pros. Like its Duo Dock ancestor, it turns the laptops into “desktop” computers. It also reduces the headache of plugging/unplugging peripherals connected to these notebooks even as it reduces desktop cable clutter. (All cables are routed to the back of your workspace, freeing up desk real estate.)
The mDock features front-facing USB (2.0, not 3.0. alas) and headphone ports and replicates the ports located on the side of MacBook Pros. You can easily plug in peripheral devices such as monitors, external drives, speakers, printers, etc.
A front-facing, 10-watt charge port can power up an iOS device. In fact, the mDock functions as a standalone USB charger when it’s not docked to your MacBook Pro.
What’s more, the mDock’s built-in hard drive — 500MB or 1TB — backs up the MBP system drive via Mac OS X’s Time Machine. It costs US$229 for a 500GB version and $299 for a 1TB model.
Note that there are two mDock models. One is compatible with the mid-2009 to current unibody 13-inch MacBook Pro; the other is compatible with the mid-2009 to current unibody 15-inch MacBook Pro.
To connect the mLogic device and a MacBook Pro, put the latter on a flat surface, align the connectors on the mDock with the corresponding ports on your laptop, and gently slide the dock until it engages the ports on your MBP. One thing to keep in mind: the port locations on your laptop can be slightly misaligned due to manufacturing variances or from damage caused during use. So never force an mDock onto your laptop as this can cause some problems.
If the mDock and MBP don’t smoothly align, mLogic includes alignment strips to ensure a proper fit. I had no connection problems, so can’t attest to how well the strips work.
Once the dock and laptop are engaged, you can connect all of your peripherals. Attach the mDock’s power adapter and plug it in. Press the button on the side of the device to power it up. The built-in back-up drive will automatically mount on the desktop. When you need to disengage:
° Unmount the mDock by dragging the icon to the trash. Or you can use the unDock app — which I prefer (more on that in a sec).
° Hold down the power button for three seconds to turn the unit off.
° Remove the mDock by gently sliding it away from your MacBook Pro.
I recommend you download the $0.99 UnDock app from the Mac App Store (though it have been nice if mLogic offered it for free). It adds an “Eject All” shortcut and lets you eject all removable drives with a single click or key strike. UnDock also cancels Time Machine cleanly if it’s performing a back-up.
The mDock looks as it good as it works. It sports a sleek, fan-less design and an aluminum enclosure that complements Apple laptops.
Unfortunately, while the mDock is compatible with the latest MacBook Pros with Thunderbolt ports, it doesn’t pass Thunderbolt data. Of course, that would have jacked up the price substantially.
Unfortunately, part II: there are no Retina display MacBook Pro or MacBook Air versions of the mDock. However, the folks at mLogic tell me that “if we see strong interest in the existing units, we intend to make versions for the latest Mac notebooks.” Keep your fingers crossed.
If the mDock entices you, you might also be on the lookout for the upcoming mDock Amigo. It’s an optional add-on accessory for that mDock that provides an iPhone/iPod dock for charging & syncing, a MagSafe Power Adapter holder and an cable management system. The folks at mLogic say the Amigo is being prepared for the “Lightning” connector on the iPhone 5 and will be “coming soon.” It should be available in 4-6 weeks at a price of around $39.
Rating: 8 out of 10
— Dennis Sellers


